
Groo
Butter Knife 버터 나이프 라이브러리 본문

안녕하세요, 오늘은 안드로이드 프로그래밍을 하면서 새롭게 공부한 내용을 여러분들에게 소개하려고합니다.
주제는 Butter Knife 버터 나이프 라이브러리이며 제가 사용하게 된 계기와 자세한 설명을 해드리도록하겠습니다.
💁 Butter Knife 알게 된 계기는?
안드로이드 프로그래밍을 처음 공부하고 작은 토이프로젝트들을 진행할 때 저는 XML 레이아웃에 있는 뷰들을 Activity에서 사용하기 위해 findViewById 매서드를 통해 매번 뷰들을 이용하였습니다. 그러나 findVIewById는 매우 효율성이 떨어졌습니다.
public class MainActivity extends AppCompatActivity {

    TextView textView;
    Button button;

    @Override
    protected void onCreate(Bundle savedInstanceState) {
        super.onCreate(savedInstanceState);
        setContentView(R.layout.activity_main);

        textView = findViewById(R.id.textView);
        button = findViewById(R.id.button);
    }
}
그 후 저는 교내의 B1ND팀에 입사를 한 후부터 팀에서 사용하는 데이터 바인딩을 공부하여 매번 사용하였습니다. (이 내용에 대해서는 다음 시간에 정리하도록 하겠습니다.) 그러나 저는 데이터 바인딩말고 또 다른 방식은 존재하지 않을까? 라는 생각이 들었습니다.
그러던 중 저는 개발자 JakeWharton이 개발한 Butter Knife 라이브러리에 대해서 알게되었고 이 라이브러리에 대해서 공부를 하고 이 라이브러리를 활용하여 작은 토이프로젝트들도 진행을 해보면서 많이 경험을 해보았습니다. 이것은 새롭고 정말 놀라웠습니다
먄약 제가 이 라이브러리를 데이터 바인딩을 배우기 이전에 먼저 알았더라면 더욱 좋았을 것이고 사용도 많이하였을 것입니다. 하지만 이미 저는 데이터 바인딩에 습관이 되어있어 이 기술을 잘 활용은 하지 않지만 아직 바인딩 기술을 공부하지 않은 사람들에게는 바인딩을 배우기 전 꼭 사용해보고 경험해보았으면 하는 라이브러리로 추천합니다. 사용 방법도 정말 간편하고 효율적이였습니다.
🙋♂️ Gradle 및 기타 설정
그럼 먼저 프로그램 내에서 Butter Knife 버터 나이프 라이브러리를 사용하기 위해 프로젝트 Gradle파일에 라이브러리를 추가해주도록 하겠습니다. 아래의 내용은 개발자 JakeWharton의 Butter Knife 라이브러리 Github Reademe에 존재하는 내용입니다.
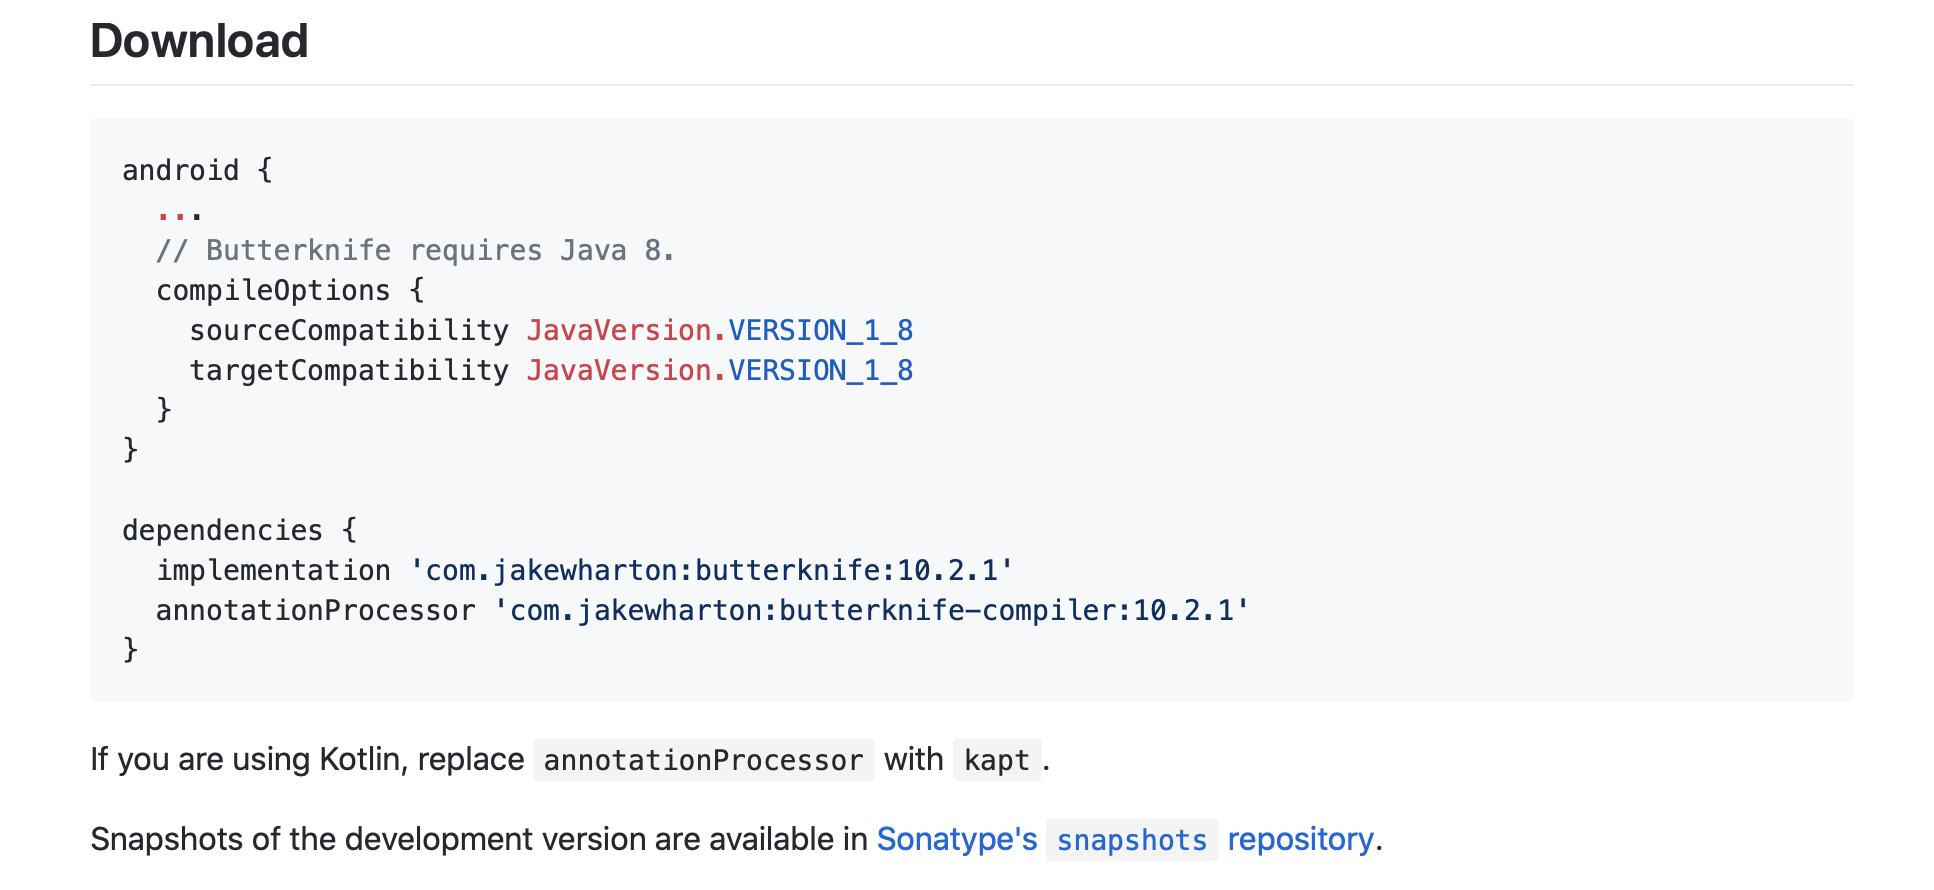
android {
    ...
    compileOptions {
        sourceCompatibility JavaVersion.VERSION_1_8
        targetCompatibility JavaVersion.VERSION_1_8
    }
}

dependencies {
    ...
    implementation 'com.jakewharton:butterknife:10.2.1'
    annotationProcessor 'com.jakewharton:butterknife-compiler:10.2.1'
}

buildscript {
    repositories {
        ...
        mavenCentral()
    }
    dependencies {
        ...
        classpath 'com.jakewharton:butterknife-gradle-plugin:10.2.1'
    }
}
🤹 Activity & Fragment Bind 설정
프로젝트 안에서 Butter Knife 라이브러리 사용하기 위한 설정을 모두 마쳤다면 이번에는 Activity, Fragment내에서 Butter Knife 라이브러리를 사용할 수 있도록 설정해야합니다. 대표적인 View로 Activity와 Fragment에서는 아래와 같이 설정합니다.
@Override
protected void onCreate(Bundle savedInstanceState) {
    super.onCreate(savedInstanceState);
    setContentView(R.layout.activity_main);
    ButterKnife.bind(this);
}
Activity와 같은 경우는 위의 코드와 같이 onCreate 매서드 안에서 ButterKnife 클래스 안의 bind 매서드를 호출하여 매서드의 target 매개변수에 tihs를 넣어주면서 위의 액티비티에서 ButterKnife 라이브러리를 사용할 수 있도록 설정을 진행하고 있습니다.
@Override
public View onCreateView(LayoutInflater inflater, ViewGroup container,
                         Bundle savedInstanceState) {

   ViewGroup rootView = (ViewGroup) inflater.inflate(
                         R.layout.fragment_main, container, false);

   ButterKnife.bind(rootView)
   return rootView;
}
Fragment도 Activity와 같이 Fragment 내의 onCreateView 매서드 안에서 선언한 ViewGroup 변수를 ButterKnife 클래스의 bind 매서드를 통해서 매개변수를 전달해준다면 Activity와 같이 똑같이 각각의 뷰에서 라이브러리를 사용할 수 있습니다.
👌 XML View 설정 방법
이번에는 XML에 존재하는 뷰들을 액티비티에서 findViewById 메서드를 사용하지 않고 Butter Knife 방식을 사용하여 뷰를 한 번 설정해보도록 하겠습니다. View를 설정해주면서 어노테이션 @Bind를 추가하여 해당 View의 id를 함께 지정해주면됩니다.
 @BindView(R.id.textView)
 TextView textView;

 @BindView(R.id.button)
 Button button;

 @BindView(R.id.editText)
EditText editText;🧑🏻💻 View ClickListener 추가
위의 방법을 통해 저희는 XML View들을 액티비티에 적용하는 것을 보았습니다. 그럼 저희가 findViewById를 사용하였을 때 사용하였던 ClickListener는 어떻게 사용할까요? ClickListener 또한 @Onclick 어노테이션을 활용하여 매서드 함수를 생성합니다.
  @OnClick(R.id.button)
  void onButtonClicked(){
     Toast.makeText(this, "클릭 이벤트 발생", Toast.LENGTH_SHORT).show()
  }
🖥 Butter Knife 방식을 활용한 간단한 프로그램
Butter Knife 라이브러리에 대해서 이제 어느정도 배웠다면 이번에는 Butter Knife 라이브러리를 활용하여 간단한 프로그램을 구성해보겠습니다. + 플러스 버튼과 - 마이너스 버튼을 만들어 각각의 버튼을 클릭할 시 값이 바뀌는 프로그램을 구성하겠습니다.
public class MainActivity extends AppCompatActivity {

    int counter = 0;

    @BindView(R.id.textView)
    TextView textView;

    @Override
    protected void onCreate(Bundle savedInstanceState) {
        super.onCreate(savedInstanceState);
        setContentView(R.layout.activity_main);
        ButterKnife.bind(this);
    }

    @OnClick(R.id.plus_button)
    void plus(){
        textView.setText(String.valueOf(++counter));
    }

    @OnClick(R.id.remove_button)
    void minus(){
        textView.setText(String.valueOf(--counter));
    }
}
<?xml version="1.0" encoding="utf-8"?>
<androidx.constraintlayout.widget.ConstraintLayout
xmlns:android="http://schemas.android.com/apk/res/android"
xmlns:app="http://schemas.android.com/apk/res-auto"
xmlns:tools="http://schemas.android.com/tools"
android:layout_width="match_parent"
android:layout_height="match_parent"
android:orientation="vertical"
tools:context=".MainActivity">
<TextView
android:id="@+id/textView"
android:layout_width="wrap_content"
android:layout_height="wrap_content"
android:text="0"
android:textSize="50sp"
app:layout_constraintBottom_toBottomOf="parent"
app:layout_constraintEnd_toEndOf="parent"
app:layout_constraintStart_toStartOf="parent"
app:layout_constraintTop_toTopOf="parent" />
<com.google.android.material.floatingactionbutton.FloatingActionButton
android:id="@+id/remove_button"
android:layout_width="wrap_content"
android:layout_height="wrap_content"
android:layout_marginBottom="104dp"
android:src="@drawable/ic_remove_black_24dp"
app:layout_constraintBottom_toBottomOf="parent"
app:layout_constraintEnd_toStartOf="@+id/plus_button"
app:layout_constraintHorizontal_bias="0.239"
app:layout_constraintStart_toStartOf="parent" />
<com.google.android.material.floatingactionbutton.FloatingActionButton
android:id="@+id/plus_button"
android:layout_width="wrap_content"
android:layout_height="wrap_content"
android:layout_marginBottom="104dp"
android:src="@drawable/ic_add_black_24dp"
app:layout_constraintBottom_toBottomOf="parent"
app:layout_constraintEnd_toEndOf="parent"
app:layout_constraintHorizontal_bias="0.85"
app:layout_constraintStart_toStartOf="parent" />
</androidx.constraintlayout.widget.ConstraintLayout>
👍 글을 마치며
오늘은 JakeWharton 개발자가 구현한 Butter Knife라는 라이브러리에 대해서 알아보았습니다. 이 라이브러리는 이전에 사용하던 findViewById 를 대신하여 XML의 뷰들이 액티비티에서 더욱 효율적으로 접근할 수 있도록 도와줍니다. 만약 여러분이 바인딩 기술을 배웠다면 오늘 배운 Butter Knife 기술을 잘 사용하지 않으실 것입니다. 저도 마찬가지입니다. 하지만 XML의 뷰를 액티비티에서 접근할 때 이러한 방법도 있다는 것을 알았으면 좋겠고 만약 여러분이 바인딩을 아직 배우지 않았고 findViewById를 사용한다면 이 방법을 사용해보고 경험해보는 것을 추천드립니다. 앞으로도 좋은 주제로 글을 작성하도록 매번 노력하겠습니다.
'Android' 카테고리의 다른 글
| Android Studio 레이어 분리 방법에 대해서 (2) | 2020.05.23 |
|---|---|
| Koin 코인 라이브러리 (1) | 2020.05.07 |
| ViewModel & LiveData 라이브러리 (7) | 2020.03.19 |
| DataBinding 데이터 바인딩 라이브러리 (0) | 2020.02.25 |
| 안드로이드 RecyclerView에 대해서 알아보자 (14) | 2020.01.15 |


